This post was originally published on this site
Every development team wants to build robust, secure, and scalable cloud applications, and that often means navigating complexity — especially when it comes to configuration management. Relying on hard-coded configurations and keys is a common practice that can expose sensitive security details. To move faster and stay secure, developers should use a centralized, secure service dedicated to managing application configurations.
Google Cloud’s solution is our Parameter Manager, designed to reduce unnecessarily sharing key cloud configurations, such as API keys, database passwords, and private encryption keys. Parameter Manager works with many types of data formats, including JSON, YAML, and other unformatted data.
It also includes format validation for JSON and YAML types to help eliminate concerns about configuration integrity. Parameter Manager also integrates with Secret Manager, to help ensure confidential data remains secure and separate.
How to use Parameter Manager
To help illustrate how easy and beneficial it can be to use Parameter Manager, we’ll guide you through a practical example: Building a simple weather application you can configure dynamically, including changing between Celsius and Fahrenheit, updating the default city, and managing your API key.
Here’s what we’ll cover:
-
Obtaining a Weather API Key and securely storing it in Secret Manager.
-
Creating a Parameter and Version to reference your API Key and hold other relevant parameters.
-
Building a Simple UI and Backend that interacts with Parameter Manager.
To complete this project, you should have an active Google Cloud project. Here’s the Code Repository for your reference.
1. Obtaining a Weather API Key and storing it securely in Secret Manager
Use any weather API Key here.
Enable the Secret Manager and Parameter Manager APIs from the console. Both have monthly free tiers that should suffice for this walkthrough.
Secret Manager and Parameter Manager home page.
Since the API Key is sensitive, store it in Secret Manager.
-
In the Google Cloud Console, search for “Secret Manager”.
-
Click on the “Create Secret” button.
-
On the creation form:
-
Define the secret name (such as weather-api-key.)
-
Paste your weather API Key into the “Secret value” section.
-
For this demo, use the default options. Feel free to explore other settings in the documentation if you wish.
-
Click “Create Secret.”
Storing Weather API key in Secret Manager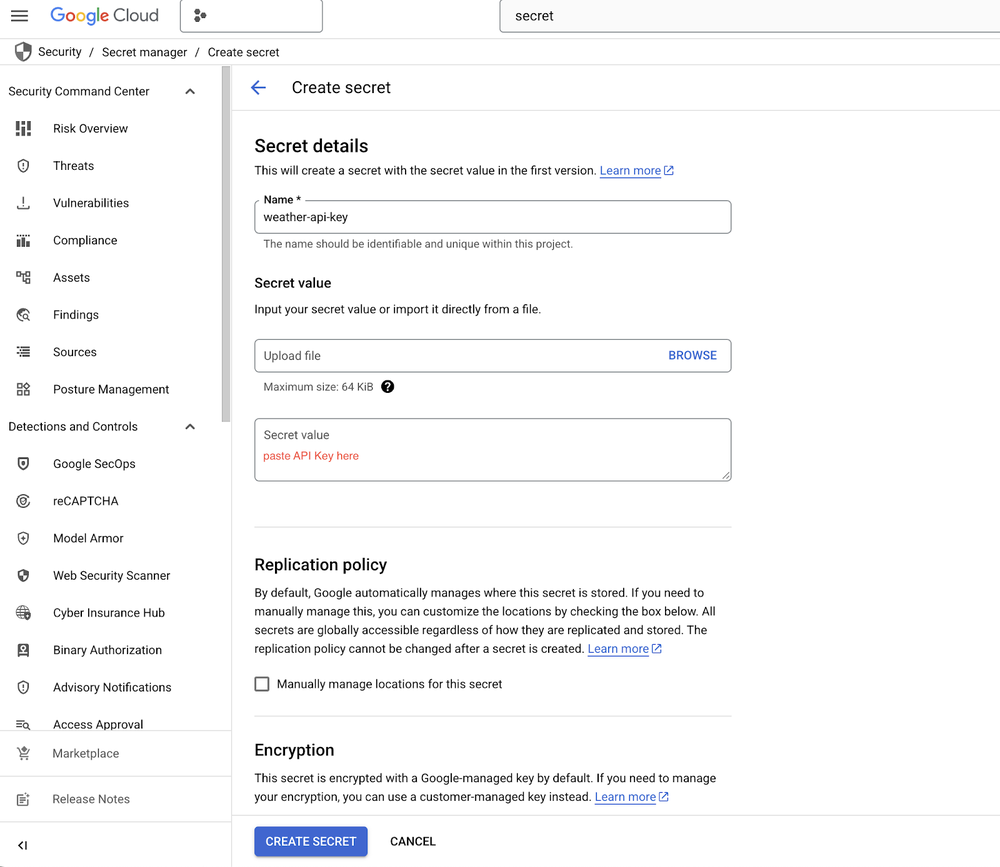
You’ve now created a Secret resource with a Secret Version containing your API Key. The interface will display its unique identifier, which will look something like this:
projects//secrets/weather-api-key
Copy this identifier. We’ll use it when creating our Parameter.
Copying Weather API key identifier.
2. Creating a Parameter and Version to reference your API Key and hold other relevant parameters
Access Parameter Manager from the Secret Manager home screen or by searching for it in the console.
Accessing Parameter Manager from the Secret Manager console.
Click on the “Create parameter” button.
Creating a parameter.
On the creation form:
-
Define the parameter name (such as my-weather-demo-parameter.)
-
Select “YAML” as the format type (Parameter Manager offers format validation for JSON and YAML formats) and submit the form.
-
As earlier, we’ll use the defaults for other options for this demo.
Parameter creation form.
Parameters offer the advantage of versioning, where each version captures a distinct snapshot of your configuration. This immutability is vital for safeguarding deployed applications against unintended breaking changes. When updates are necessary, a new version can be easily created.
Create a new version for this Parameter by clicking on “New Version”.
Creating a parameter version.
-
Provide a “Name” for your Parameter Version (such as v1 for your initial application version.) Pro tip: Iterate your version numbers to keep track of different versions.
-
In the payload section, paste the following YAML. Crucially, replace with your actual Google Cloud project number and ensure the apiKey attribute correctly references your Secret Manager Secret’s identifier.
- code_block
- <ListValue: [StructValue([('code', "version: 'v1'rnapiKey: '__REF__(//secretmanager.googleapis.com/projects//secrets/weather-api-key/versions/1)’rnfahrenheit: falserndefaultLocation: ‘London’rnshowHumidity: falsern# dummy values, useful when the app is not connected to internet after going live & loading this config or when the weather API is downrndummyData:rn- rn city: ‘London’rn temperature: ’15°C’rn description: ‘Partly Cloudy’rn humidity: ‘70%’rn windSpeed: ’10 km/h’rn icon: ‘http://openweathermap.org/img/wn/02d@2x.png’rn- rn city: ‘New York’rn temperature: ’22°C’rn description: ‘Sunny’rn humidity: ‘55%’rn windSpeed: ’12 km/h’rn icon: ‘http://openweathermap.org/img/wn/03d@2x.png’rn-rn city: ‘Tokyo’rn temperature: ’28°C’rn description: ‘Clear Sky’rn humidity: ‘60%’rn windSpeed: ‘8 km/h’rn icon: ‘http://openweathermap.org/img/wn/04n@2x.png’rn-rn city: ‘Paris’rn temperature: ’18°C’rn description: ‘Light Rain’rn humidity: ‘85%’rn windSpeed: ’15 km/h’rn icon: ‘http://openweathermap.org/img/wn/04d@2x.png’rn-rn city: ‘Sydney’rn temperature: ’20°C’rn description: ‘Mostly Sunny’rn humidity: ‘65%’rn windSpeed: ‘9 km/h’rn icon: ‘http://openweathermap.org/img/wn/04n@2x.png'”), (‘language’, ”), (‘caption’, )])]>
Submit the form after specifying the above payload data.
Parameter version creation form.
Key Point: Notice the __REF__ syntax for the apiKey. This is how Parameter Manager securely references data from Secret Manager:__REF__(//secretmanager.googleapis.com/projects//secrets//versions/)
You can also use the special alias “latest” instead of a specific version ID to always retrieve the most recently created Secret Version. (Learn more about Secret references in Parameter Manager documentation).
IAM principal identifier for a parameter.
For Parameter Manager to successfully resolve the Secret Manager reference, it needs permission to access your secret.
-
Navigate back to your Parameter’s list view and click on your newly created Parameter.
-
Go to the “Overview” section. Copy the “IAM Principal Identifier.” This is a unique service account associated with your Parameter.
-
Now, navigate back to your Secret Manager service and open the secret you created.
-
Go to the “Permissions” section and click “Grant Access.”
-
In the “New principals” field, paste the IAM Principal Identifier you copied from Parameter Manager.
-
Select the role “Secret Manager Secret Accessor.”
-
Click “Save.”
This step authorizes all Parameter Versions created under the Parameter to securely access and resolve the secret containing your API Key.
Granting Secret access permissions to Parameter’s IAM principal identifier.
Let’s confirm everything is set up correctly. Navigate to the Parameter Version you just created and click on “Render” from the “Actions” menu.
Testing Secret References are working by performing a render operation.
If your permissions are correctly configured, Parameter Manager will display the “Rendered output,” which will include your actual weather API Key securely retrieved from Secret Manager! This confirms your configuration is ready to be consumed by your application.
Verifying secret substitution in rendered output.
Building a simple UI and backend that can talk to Parameter Manager
Now that our configurations are securely stored and managed, let’s build a simple application to consume them. We’ll create a React frontend and a Node.js backend.
- code_block
- <ListValue: [StructValue([('code', 'npx create-react-app parameter-manager-weather-apprncd parameter-manager-weather-apprnnpm install axios'), ('language', ''), ('caption', )])]>
Make sure your src/index.js looks something like:
- code_block
- <ListValue: [StructValue([('code', "import React from 'react';rnimport ReactDOM from 'react-dom/client';rnimport './index.css';rnimport App from './App';rnimport reportWebVitals from './reportWebVitals';rnrnconst root = ReactDOM.createRoot(document.getElementById('root'));rnroot.render(rn rn rn rn);rnrn// If you want to start measuring performance in your app, pass a functionrn// to log results (for example: reportWebVitals(console.log))rn// or send to an analytics endpoint. Learn more: https://bit.ly/CRA-vitalsrnreportWebVitals();”), (‘language’, ‘lang-py’), (‘caption’, )])]>
Now, edit your src/App.js with the following code:
- code_block
- {rn setLoading(true); // Set loading to true when fetching startsrn setError(”); // Clear any previous errorsrn setWeatherData(null); // Clear previous weather datarnrn try {rn // Make Axios GET request to your Node.js backend serverrn const response = await axios.get(`http://localhost:5001/api/weather`, {rn params: {rn city: searchCityrn }rn });rnrn // Assuming your backend sends back data in a format like:rn // { city: ‘London’, temperature: ’15°C’, description: ‘Partly Cloudy’, humidity: ‘70%’, windSpeed: ’10 km/h’, icon: ‘…’ }rn setWeatherData(response.data);rn console.log(response.data)rn } catch (err) {rn console.error(‘Error fetching weather from backend:’, err);rn // Handle different error responses from the backendrn if (err.response && err.response.data && err.response.data.message) {rn setError(`Error: ${err.response.data.message}`);rn } else {rn setError(‘Failed to fetch weather data. Please ensure the backend server is running and try again.’);rn }rn } finally {rn setLoading(false); // Set loading to false once fetching is completern }rn };rnrn // Handle form submissionrn const handleSubmit = (e) => {rn e.preventDefault(); // Prevent default form submission behaviorrn if (city.trim()) { // Only fetch if city input is not emptyrn fetchWeather(city.trim());rn } else {rn setError(‘Please enter a city name.’);rn }rn };rnrn return (rn
rnrn
rn Weather Apprn {(weatherData && weatherData.offline) && (rn
rn Weather API is offline! showing dummy data from a default location.rn {error}rnrn )}rn
rnrn {/* City Search Form */}rn rn setCity(e.target.value)}rn placeholder=”Enter city name (e.g., London)”rn className=”flex-grow p-3 rounded-xl border border-gray-300 focus:ring-2 focus:ring-blue-500 focus:border-transparent outline-none text-gray-700″rn />rn rn {loading ? ‘Searching…’ : ‘Get Weather’}rn rn rnrn {/* Loading and Error Messages */}rn {loading && (rn
rn rn rn rn rn Loading weather data…rnrn )}rnrn {error && (rn
rn Error!rn {error}rnrn )}rnrn {/* Weather Display */}rn {weatherData && !loading && (rn
rnrn{weatherData.city}
rn rn
rn
{weatherData.temperature}
rn
{weatherData.description}
rn
rn {weatherData.showHumidity && (Humidity: {weatherData.humidity}
)}rn
Wind Speed: {weatherData.windSpeed}
rn
rn
rn )}rnrn {/* Initial message or no data message */}rn {!weatherData && !loading && !error && (rn
rn Enter a city name above to get started!rnrn )}rn
rn
rn );rn}rnrnexport default App;’), (‘language’, ”), (‘caption’, )])]>
-
Clear the App.css file (or delete it & remove its references if required). We will be using tailwind so add the following in public/index.html, inside the tag:
-
Your public/index.html would look something like:
- code_block
- <ListValue: [StructValue([('code', 'rnrn rn rn rn rn rn rn rn rn rn rn rn rn
React App rn rn rn You need to enable JavaScript to run this app.rnrn <!–rn This HTML file is a template.rn If you open it directly in the browser, you will see an empty page.rn You can add webfonts, meta tags, or analytics to this file.rn The build step will place the bundled scripts into the tag.rn To begin the development, run `npm start` or `yarn start`.rn To create a production bundle, use `npm run build` or `yarn build`.rn –>rn rn’), (‘language’, ”), (‘caption’, )])]>
Now we need a server to serve weather API responses:
- code_block
- <ListValue: [StructValue([('code', 'mkdir weather-backendrnrncd weather-backendrnrnnpm init -yrnrnnpm install @google-cloud/parametermanagerrnrnnpm install cors express yamlrnrnnpm install node-fetch@2'), ('language', ''), ('caption', )])]>
Install gcloud by following the instructions at install-sdk if you don’t have it already.
Then run:
- code_block
- <ListValue: [StructValue([('code', 'gcloud auth application-default login'), ('language', ''), ('caption', )])]>
Now, within the weather-backend directory create a server.js file with the following code:
- code_block
- {rn const city = req.query.city; // Get city from query parameters (e.g., /api/weather?city=London)rnrn if (!city) {rn // If no city is provided, send a 400 Bad Request errorrn return res.status(400).json({ message: ‘City parameter is required.’ });rn }rnrn try {rn // Construct the OpenWeatherMap API URLrn let unit = “metric”rn let temperatureSuffix = “°C”rn if (CONFIG.fahrenheit) {rn unit = “imperial”rn temperatureSuffix = “°F”rn }rn const apiUrl = `${OPENWEATHER_BASE_URL}?q=${city}&appid=${OPENWEATHER_API_KEY}&units=${unit}`; // units=metric for Celsiusrn console.log(apiUrl)rnrn // Make the API call to OpenWeatherMaprn const response = await fetch(apiUrl);rn const data = await response.json();rnrn // Check if the API call was successfulrn if (response.ok) {rn // Process the data to send a simplified, relevant response to the frontendrn const weatherData = {rn city: data.name,rn country: data.sys.country,rn temperature: `${Math.round(data.main.temp)}${temperatureSuffix}`, // Round temperaturern description: data.weather[0].description,rn humidity: `${data.main.humidity}%`,rn showHumidity: CONFIG.showHumidity,rn windSpeed: `${Math.round(data.wind.speed * 3.6)} km/h`, // Convert m/s to km/hrn icon: `http://openweathermap.org/img/wn/${data.weather[0].icon}@2x.png`, // OpenWeatherMap icon URLrn offline: falsern };rn res.json(weatherData); // Send processed data to frontendrn } else {rn // If OpenWeatherMap returns an error (e.g., city not found or API is down)rn console.error(‘OpenWeatherMap API Error:’, data);rnrn // return dummy data based on defaultLocationrn const dummyData = CONFIG.dummyData.find((d) => d.city === CONFIG.defaultLocation)rnrn const weatherData = {rn city: dummyData.city,rn temperature: `${dummyData.temperature}`,rn description: dummyData.description,rn humidity: `${dummyData.humidity}`,rn showHumidity: CONFIG.showHumidity,rn windSpeed: `${dummyData.windSpeed}`,rn icon: `${dummyData.icon}`, // OpenWeatherMap icon URLrn offline: truern };rnrn res.json(weatherData); // Send processed dummy data to frontendrn }rn } catch (error) {rn // Catch any network or server-side errorsrn console.error(‘Server error fetching weather:’, error);rn res.status(500).json({ message: ‘Internal server error.’ });rn }rn});rnrn// Start the serverrn(async () => {rn try {rn // Fetch the application parameters & set them in CONFIG variablern await callRenderParameterVersion(startupConfig + appVersion)rnrn app.listen(PORT, () => {rn OPENWEATHER_API_KEY = CONFIG.apiKeyrn console.log(`Node.js Weather Backend listening on port ${PORT}`);rn console.log(`Visit http://localhost:${PORT}/api/weather?city=London in your browser to test.`);rn });rn } catch (error) {rn console.error(‘Error during pre-server setup:’, error);rn process.exit(1); // Exit if critical setup failsrn }rn})();’), (‘language’, ”), (‘caption’, )])]>
This server is responsible for fetching the application parameters from Parameter Manager on startup. Use that to serve the necessary responses from the weather API.
The parameters stored in Parameter Manager contain the weather API Key, metric system configuration, and other relevant application specific data. It also contains some dummy data that can be used by the server in events when the server is not connected to the weather API due to some issue.
Open two separate terminal shells:
- code_block
- <ListValue: [StructValue([('code', '## In First Shell:rnrncd parameter-manager-weather-app/weather-backendrnrngcloud auth application-default loginrnrnnode server.js'), ('language', ''), ('caption', )])]>
Your backend server will start, loading the configuration from Parameter Manager, including the securely resolved API Key from Secret Manager.
- code_block
- <ListValue: [StructValue([('code', '## In Second Shell:rnrncd parameter-manager-weather-apprnrnnpm start'), ('language', ''), ('caption', )])]>
Your React frontend will launch, connect to your local backend, and start requesting weather information, dynamically configured by Parameter Manager.
Running the Application in browser.
Viewing weather details in the application.
Beyond the basics: Advanced use cases
Parameter Manager can help developers achieve their configuration security and compliance goals. It can help you:
-
Offer regional configurations: Imagine your app serves users globally. Some regions may prefer Celsius, others Fahrenheit. You can create regional Parameters in different Google Cloud regions, each with different values for Fahrenheit and defaultLocation. By setting the startupConfigLocation in your server.js (or in your deployment environment), your servers can automatically load the configuration relevant to that region.
-
Meet regional compliance requirements: Parameters can only reference Secrets from the same region. For this walkthrough, we used a global region for both Secrets and Parameters, but you can create Regional Secrets in, for example, us-central1, and expect that only Parameters in us-central1 can reference the Secret. This can help to ensure that your sensitive information never leaves the region of your choice.
-
Implement A/B testing and feature flags: To test a new feature with a subset of users, you can add a new attribute to a v2 Parameter Version. Then you can dynamically switch the appVersion constant in your backend (or via an environment variable in a deployed environment) based on your A/B testing strategy, and roll out new features to different user groups, gather feedback, and iterate quickly.
By using Google Cloud Parameter Manager and Secret Manager, you can gain a robust, secure, and flexible system for managing all your application configurations, empowering you to build more agile and resilient applications.